Note
Go to the end to download the full example code.
Creating your own electrode array
This example shows how to create a new
ElectrodeArray object.
As the base class for all electrode arrays in pulse2percept, the
ElectrodeArray class provides a blue print
for the functionality that every electrode array should have.
First and foremost, an ElectrodeArray
contains a collection of Electrode objects,
and new electrodes can be added via the
add_electrodes() method.
In addition, individual electrodes in the array can be accessed by indexing using either their pre-assigned names (a string) or their place in the array (integer).
Arranging electrodes in a circle
In this example, we want to build a new type of electrode array that arranges all of its electrodes in a circle.
To do this, we need to create a new class CircleElectrodeArray that is
a child of ElectrodeArray:
class CircleElectrodeArray(ElectrodeArray):
    """Electrodes arranged in a circle"""
    ...
This way, the CircleElectrodeArray class can access all public methods
of ElectrodeArray.
The constructor then has the job of creating all electrodes in the array
and placing them at the appropriate location; for example, by using the
add_electrodes() method.
The constructor of the class should accept a number of arguments:
n_electrodes: how many electrodes to arrange in a circleradius: the radius of the circlex_center: the x-coordinate of the center of the circley_center: the y-coordinate of the center of the circle
For simplicity, we will use DiskElectrode
objects of a given radius (100um), although it would be relatively straightforward
to allow the user to choose the electrode type.
from pulse2percept.implants import ElectrodeArray, DiskElectrode
import collections as coll
import numpy as np


class CircleElectrodeArray(ElectrodeArray):

    def __init__(self, n_electrodes, radius, x_center, y_center):
        """Electrodes arranged in a circle

        Electrodes will be named 'A0', 'A1', ...

        Parameters
        ----------
        n_electrodes : int
            how many electrodes to arrange in a circle
        radius : float
            the radius of the circle (microns)
        x_center, y_center : float
            the x,y coordinates of the center of the circle (microns),
            where (0,0) is the center of the fovea
        """
        # The job of the constructor is to create the electrodes. We start
        # with an empty collection:
        self._electrodes = coll.OrderedDict()
        # We then generate a number `n_electrodes` of electrodes, arranged on
        # the circumference of a circle:
        for n in range(n_electrodes):
            # Angular position of the electrode:
            ang = 2.0 * np.pi / n_electrodes * n
            # Create the disk electrode:
            electrode = DiskElectrode(x_center + np.cos(ang) * radius,
                                      y_center + np.sin(ang) * radius, 0, 100)
            # Add the electrode to the collection:
            self.add_electrode('A' + str(n), electrode)
Using the CircleElectrodeArray class
To use the new class, we need to specify all input arguments and pass them to the constructor:
n_electrodes = 10
radius = 1000  # radius in microns
x_center = 0  # x-coordinate of circle center (microns)
y_center = 0  # y-coordinate of circle center (microns)

# Create a new instance of type CircleElectrodeArray:
earray = CircleElectrodeArray(n_electrodes, radius, x_center, y_center)
print(earray)
CircleElectrodeArray(electrodes=OrderedDict,
                     n_electrodes=10)
Individual electrodes can be accessed by their name or integer index:
earray[0]

earray['A0']

earray[0] == earray['A0']
True
Visualizing the electrode array
Electrode arrays come with their own plotting method:
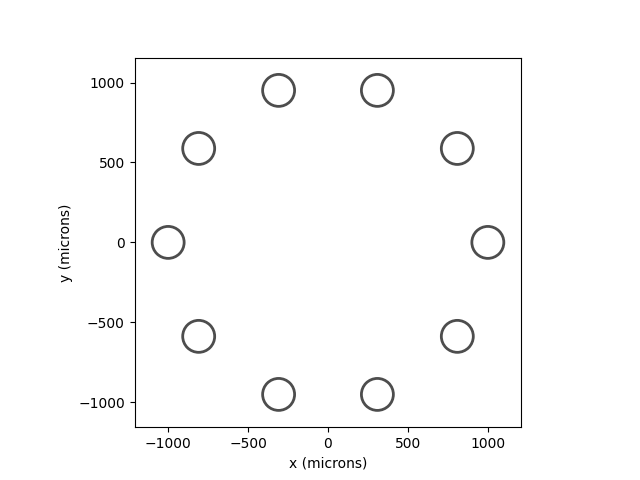
<Axes: xlabel='x (microns)', ylabel='y (microns)'>
By default, the method will use the current Axes object or create a new one
if none exists. Alternatively, you can specify ax= yourself.
Extending the CircleElectrodeArray class
Similar to extending ElectrodeArray for
our purposes, we can extend CircleElectrodeArray.
To add new functionality, we could simply edit the above constructor. However, nobody stops us from creating our own hierarchy of classes.
For example, we could build a FlexibleCircleElectrodeArray that allows us
to remove individual electrodes from the array:
class FlexibleCircleElectrodeArray(CircleElectrodeArray):

    def remove(self, name):
        """Deletean electrode from the array

        Parameters
        ----------
        name : int, string
            the name of the electrode to be removed
        """
        del self.electrodes[name]
Note how we didn’t even specify a constructor. By default, the class inherits all (public) functionality from its parent, including its constructor. So the following line will create the same electrode array as above:
flex_earray = FlexibleCircleElectrodeArray(
    n_electrodes, radius, x_center, y_center)
print(flex_earray)
FlexibleCircleElectrodeArray(electrodes=OrderedDict,
                             n_electrodes=10)
A single electrode can be removed by passing its name to the remove
method:
# Remove electrode 'A1'
flex_earray.remove('A1')

# Replot the implant:
flex_earray.plot()
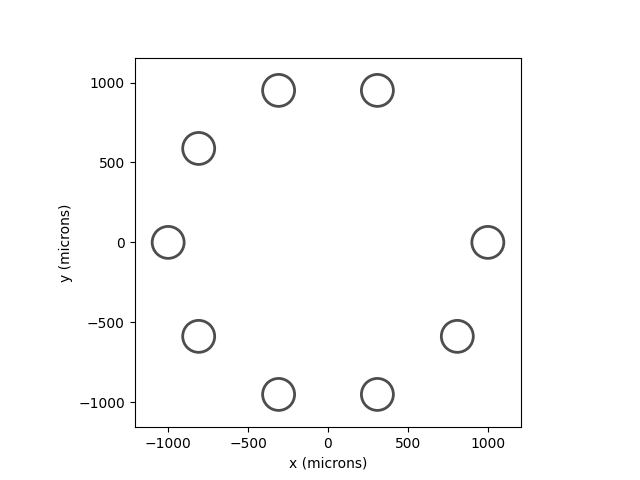
<Axes: xlabel='x (microns)', ylabel='y (microns)'>
Total running time of the script: (0 minutes 0.066 seconds)