Visual Prostheses
Objects in the implants module are organized into the
following categories:
Electrodes are objects whose behavior is dictated by the
Electrodebase class.Electrode arrays are collections of
Electrodeobjects whose behavior is dictated by theElectrodeArrayclass.Prosthesis systems (aka ‘implants’, aka ‘bionic eye’) are comprised of an
ElectrodeArrayobject and (optionally) aStimulusobject. Their behavior is dictated by theProsthesisSystembase class.
Prosthesis systems
pulse2percept provides the following prosthesis systems (aka ‘implants’, ‘bionic eyes’, ‘neuroprostheses’):
Implant |
Location |
Num Electrodes |
Manufacturer |
ArgusI |
epiretinal |
16 |
Second Sight Medical Products Inc |
ArgusII |
epiretinal |
60 |
Second Sight Medical Products Inc |
IMIE |
epiretinal |
256 |
IntelliMicro Medical Co., Ltd |
AlphaIMS |
subretinal |
1500 |
Retina Implant AG |
AlphaAMS |
subretinal |
1600 |
Retina Implant AG |
PRIMA |
subretinal |
378 |
Pixium Vision SA |
PRIMA75 |
subretinal |
142 |
Pixium Vision SA |
PRIMA55 |
subretinal |
273(?) |
Pixium Vision SA |
PRIMA40 |
subretinal |
532(?) |
Pixium Vision SA |
BVT24 |
suprachoroidal |
24 |
Bionic Vision Technologies |
BVT44 |
suprachoroidal |
44 |
Bionic Vision Technologies |
Orion |
cortical |
60 |
Cortigent Inc |
Cortivis |
cortical |
96 |
Biomedical Technologies |
ICVP |
cortical |
16 |
Sigenics Inc |
Neuralink |
cortical |
32 / thread |
Neuralink Corp |
Stimuli can be assigned to the various electrodes in the electrode array, who will deliver them to the retina (see Electrical Stimuli). A mathematical model is then used to compute the neural stimulus response and predict the resulting visual percept (see Computational Models).
Understanding the coordinate system (Retina)
The easiest way to understand the coordinate system is to look at the organization of the optic fiber layer:
In [1]: from pulse2percept.models import AxonMapModel

In [2]: AxonMapModel(eye='RE').plot()
Out[2]: <Axes: xlabel='x (microns)', ylabel='y (microns)'>
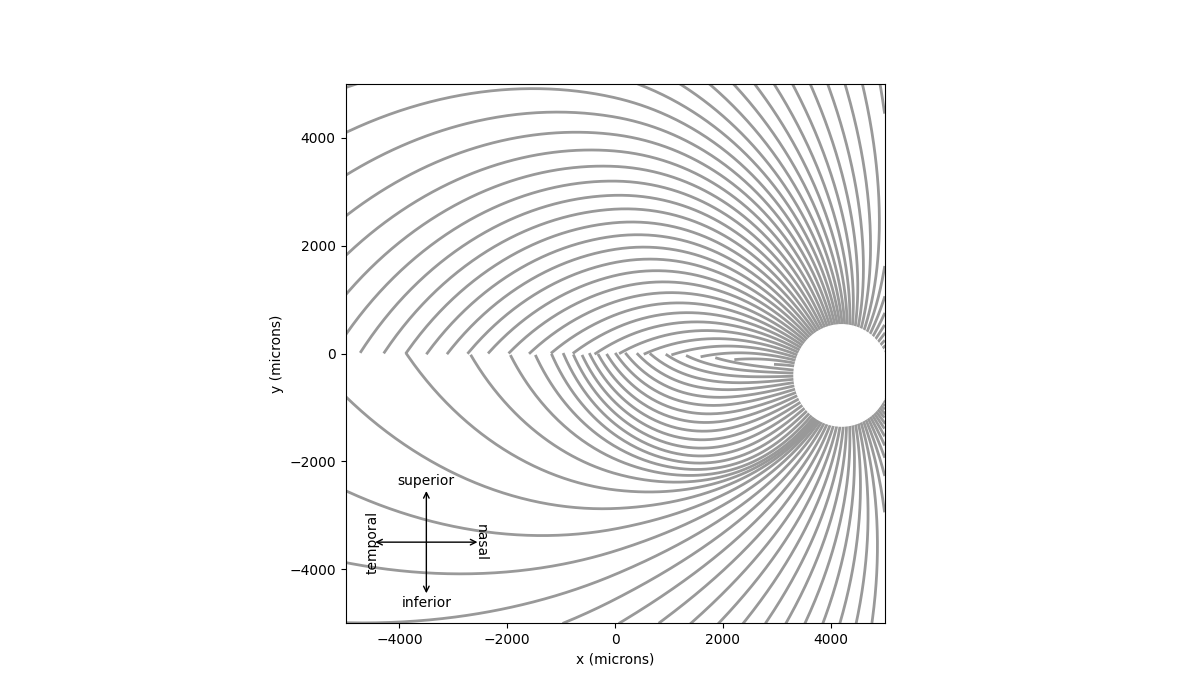
Here you can see that:
the coordinate system is centered on the fovea
in a right eye, positive \(x\) values correspond to the nasal retina
in a right eye, positive \(y\) values correspond to the superior retina
Positive \(z\) values move an electrode away from the retina into the vitreous humor (\(z\) is sometimes called electrode-retina distance). Analogously, negative \(z\) values move an electrode through the different retinal layers towards the outer retina.
Understanding the ProsthesisSystem class
The ProsthesisSystem base class provides
a template for all prosthesis systems. It is comprised of:
ElectrodeArray: as mentioned above,Stimulus: as mentioned above,check_stim: a method that quality-checks the stimulus. By default this method does nothing, but its behavior might depend on the actual system, such asArgusIIorAlphaIMS,eye: a string indicating whether the system is implanted in the left or right eye,a means to access and iterate over electrodes in the array.
Accessing electrodes
You can access individual electrodes in a prosthesis system either by integer
index or by electrode name. For example, the first electrode in
AlphaAMS can be accessed as follows:
In [3]: from pulse2percept.implants import AlphaAMS

In [4]: implant = AlphaAMS()

# Access by index:
In [5]: implant[0]
Out[5]:
DiskElectrode(activated=True, name='A1', r=15.0, x=-1365.0,
              y=-1365.0, z=0.0)

# Access by name:
In [6]: implant['A1']
Out[6]:
DiskElectrode(activated=True, name='A1', r=15.0, x=-1365.0,
              y=-1365.0, z=0.0)
The simplest way to iterate over all electrodes is to pretend that the prosthesis system is a Python dictionary:
In [7]: from pulse2percept.implants import ArgusI

In [8]: for name, electrode in ArgusI().electrodes.items():
   ...:     print(name, electrode)
   ...:
A1 DiskElectrode(activated=True, name='A1', r=125.0,
              x=-1200.0, y=-1200.0, z=0.0)
B1 DiskElectrode(activated=True, name='B1', r=250.0, x=-400.0,
              y=-1200.0, z=0.0)
C1 DiskElectrode(activated=True, name='C1', r=125.0, x=400.0,
              y=-1200.0, z=0.0)
D1 DiskElectrode(activated=True, name='D1', r=250.0, x=1200.0,
              y=-1200.0, z=0.0)
A2 DiskElectrode(activated=True, name='A2', r=250.0,
              x=-1200.0, y=-400.0, z=0.0)
B2 DiskElectrode(activated=True, name='B2', r=125.0, x=-400.0,
              y=-400.0, z=0.0)
C2 DiskElectrode(activated=True, name='C2', r=250.0, x=400.0,
              y=-400.0, z=0.0)
D2 DiskElectrode(activated=True, name='D2', r=125.0, x=1200.0,
              y=-400.0, z=0.0)
A3 DiskElectrode(activated=True, name='A3', r=125.0,
              x=-1200.0, y=400.0, z=0.0)
B3 DiskElectrode(activated=True, name='B3', r=250.0, x=-400.0,
              y=400.0, z=0.0)
C3 DiskElectrode(activated=True, name='C3', r=125.0, x=400.0,
              y=400.0, z=0.0)
D3 DiskElectrode(activated=True, name='D3', r=250.0, x=1200.0,
              y=400.0, z=0.0)
A4 DiskElectrode(activated=True, name='A4', r=250.0,
              x=-1200.0, y=1200.0, z=0.0)
B4 DiskElectrode(activated=True, name='B4', r=125.0, x=-400.0,
              y=1200.0, z=0.0)
C4 DiskElectrode(activated=True, name='C4', r=250.0, x=400.0,
              y=1200.0, z=0.0)
D4 DiskElectrode(activated=True, name='D4', r=125.0, x=1200.0,
              y=1200.0, z=0.0)
Creating your own prosthesis system
You can quickly create a prosthesis system from an
ElectrodeArray (or even a single
Electrode) by wrapping it in a
ProsthesisSystem container:
In [9]: from pulse2percept.implants import ElectrodeGrid, ProsthesisSystem

In [10]: ProsthesisSystem(earray=ElectrodeGrid((10, 10), 200))
Out[10]:
ProsthesisSystem(earray=ElectrodeGrid, eye='RE',
                 preprocess=False, safe_mode=False,
                 stim=None)
To create a more advanced prosthesis system, you will need to subclass the base class:
import numpy as np
from pulse2percept.implants import ElectrodeGrid, ProsthesisSystem

class MyFovealElectrodeGrid(ProsthesisSystem):
    """An ElectrodeGrid implant centered over the fovea"""

    def __init__(self, stim=None, eye='RE'):
        self.earray = ElectrodeGrid((3, 3), x=0, y=0, z=0, rot=0,
                                    r=100, spacing=500,
                                    names=('A', '1'))
        self.stim = stim
        self.eye = eye

    def check_stim(self, stim):
        """Make sure the stimulus is charge-balanced"""
        if stim.time is not None:
            for s in stim:
                assert np.isclose(np.sum(s), 0)
Electrode arrays
Electrode arrays are collections of
Electrode objects whose behavior is
dictated by the ElectrodeArray base class.
See also
Understanding the ElectrodeArray class
The ElectrodeArray base provides:
electrodes: an ordered dictionary of electrode objects (meaning it will remember the order in which electrodes were added),n_electrodes: a property returning the number of electrodes in the array.add_electrode(): a method to add a single electrode to the collection,add_electrodes(): a method to add a multiple electrodes to the collection at once,a way to access a single electrode either by index or by name,
a way to iterate over all electrodes in the array.
Accessing electrodes
You can access individual electrodes in an electrode array either by integer index or by electrode name. The syntax is exactly the same as for the prosthesis system.
Creating your own electrode array
You can create your own electrode array by starting with an empty
ElectrodeArray, and adding the desired
electrodes one by one:
In [11]: from pulse2percept.implants import DiskElectrode, ElectrodeArray

In [12]: earray = ElectrodeArray([])

In [13]: earray.add_electrode(0, DiskElectrode(0, 0, 0, 50))

In [14]: earray.add_electrode(1, DiskElectrode(100, 100, 0, 150))

In [15]: earray
Out[15]: ElectrodeArray(electrodes=OrderedDict, n_electrodes=2)
To create a more advanced electrode array, you will need to subclass the base
class. In the constructor, make sure to initialize self.electrodes with an
ordered dictionary (OrderedDict):
from collections import OrderedDict
from pulse2percept.implants import ElectrodeArray

class MyElectrodeArray(ElectrodeArray):
    """Array with a single disk electrode"""

    def __init__(self, name):
        self.electrodes = OrderedDict()
        self.add_electrode(name, DiskElectrode(0, 0, 0, 100))
Electrodes
Electrodes are objects whose behavior is dictated by the
Electrode base class.
They are located at a particular 3D location and provide a method to calculate
the electric potential at arbitrary 3D locations.
Understanding the Electrode class
The base class provides:
the 3D coordinates of the center of the electrode.
In addition, a custom electrode object must implement:
a method called
electric_potential()that returns the electric potential at a point (x, y, z).
Creating your own electrode
To create a new electrode type, you will need to subclass the base class.
Make sure to specify an electric_potential method for your class:
from pulse2percept.implants import Electrode

class MyElectrode(Electrode):
    """Named electrode with electric potential 0 everywhere"""

    def __init__(self, x, y, z, name):
        # Note: If you don't plan on adding any new variables, you can
        # omit the constructor entirely. In that case, your object will
        # inherit the constructor of the base class.
        self.x = x
        self.y = y
        self.z = z
        self.name = name

    def electric_potential(self, x, y, z):
        return 0.0